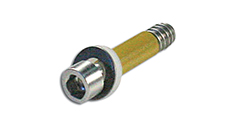
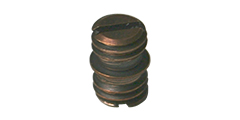
장착 스터드 및 나사
최상의 센서 데이터를 얻으려면 센서를 시험 대상에 단단히 고정해야 합니다. 시험 대상에 단단히 연결하면 센서의 상한 주파수 응답 범위 내에서 가능한 가장 높은 주파수 응답을 얻을 수 있습니다. 센서를 느슨하게 장착하면 축에서 벗어난 방향이 발생할 수 있습니다. 이를 방지하기 위해 센서를 장착하기 전에 장착 위치를 "대향"하는 것이 필수적입니다. 가속도계를 제대로 장착하려면 평평한(대향된) 표면이 필요합니다. 평평한(대향된) 표면에 수직으로 구멍을 뚫고 나사를 조이십시오. 장착 스터드 또는 나사가 이 구멍에 맞물립니다.
정확한 측정을 위해 가속도계는 항상 데이터시트에 권장된 장착 토크에 맞춰 장착하십시오. 또한 스터드가 시험 대상이나 가속도계의 나사산 장착 구멍에 닿지 않도록 하십시오. 숄더 스터드는 일반적으로 바닥이 드러나는 것을 방지합니다. 센서 바닥이 숄더를 수용할 수 있도록 카운터보어링되어 있는지 확인하십시오. 설치 후 가속도계 바닥은 시험 대상 표면과 같은 높이가 되어야 합니다. 특정 그리스 또는 경질 엔진 오일의 상한 온도보다 낮은 온도 환경에서는 소량의 그리스 또는 오일이 시험 대상과 센서 사이의 평평한 표면을 "적셔야" 합니다. 이 그리스 또는 오일은 종종 "커플랜트(Couplant)"라고 합니다.
최종 사용자가 만든 장착 장치 대신 공급업체에서 제조한 장착 어댑터를 사용하는 것이 항상 가장 좋은 방법일까요?
절연 스터드는 센서 케이스와 금속 시험 물체의 외피 사이의 연속성을 허용하지 않습니다. 이는 "접지 루프"를 방지하여 데이터 품질을 향상시킵니다.

스타일 "A"

스타일 "B"
스타일 "C"
스타일 "D"
스타일 "E"
|
장착 스터드 및 나사
|
|||
|
모델 번호
|
설치
|
논평
|
스타일
|
|
5-40 스터드에서 5-40 스터드로
|
일부 3축 가속도계의 경우 BeCu
|
비
|
|
|
5-40 스터드에서 10-32 스터드로
|
어댑터 스터드, BeCu
|
에이
|
|
|
5-40 나사산에서 10-32 스터드로
|
어댑터 플레이트, 직경 0.5인치, 플랫 7/16인치
|
이자형
|
|
|
5-40 나사산에서 10-32 스터드로
|
어댑터 플레이트, 널링이 있는 직경 0.75인치
|
이자형
|
|
|
M3 x 0.5 나사산에서 10-32 스터드까지
|
어댑터 플레이트, 직경 0.5인치, 플랫 7/16인치
|
이자형
|
|
|
M3 x 0.5 나사산에서 10-32 스터드까지
|
어댑터 플레이트, 널링이 있는 직경 0.75인치
|
이자형
|
|
|
6-32 나사산에서 10-32 스터드로
|
어댑터 플레이트, 직경 0.75인치, 5/8인치 플랫으로 널링 처리됨
|
이자형
|
|
|
10-32 스터드에서 10-32 스터드로
|
대부분의 가속도계에 대해 어깨, BeCu가 있음
|
비
|
|
|
10-32 스터드에서 10-32 스터드로
|
전기 절연 장착 패드/스터드, 0.75인치 육각형
|
디
|
|
|
10-32 스터드에서 10-32 스터드로
|
전기 절연 장착 패드/긴 스터드, 0.75인치 육각형
|
디
|
|
|
10-32 스터드에서 M5 x 0.8 스터드까지
|
어댑터 스터드, BeCu
|
에이
|
|
|
10-32 스터드에서 M6 x 0.75 스터드까지
|
어댑터 스터드, 숄더 포함, BeCu
|
에이
|
|
|
10-32 스터드에서 M6 x 1 스터드까지
|
어댑터 스터드, 숄더 포함, 스테인리스 스틸
|
에이
|
|
|
10-32 스터드에서 1/4-28 스터드까지
|
어댑터 스터드, BeCu
|
에이
|
|
|
1/4-28 스터드에서 1/4-28 스터드로
|
어깨, BeCu 포함
|
비
|
|
|
1/4-28 스터드에서 1/4-28 스터드로
|
모델 350A96 충격 가속도계용 스테인리스 스틸
|
비
|
|
|
1/4-28 스터드에서 M6 x 0.75 스터드까지
|
어댑터 스터드, 숄더 포함, BeCu
|
에이
|
|
|
6-32 스레드 x 0.63인치 길이
|
355 시리즈 링 모양 가속도계용 캡 나사
|
기음
|
|
|
M3 x 0.5 나사산 x 16mm 길이
|
355 시리즈 링 모양 가속도계용 캡 나사
|
기음
|
|
|
2-56 나사산 x 0.375인치 길이
|
355B12 및 357A06용 캡 나사
|
기음
|
|
|
M2 x 0.4 나사산 x 0.37인치 길이
|
355B12 및 357A06용 캡 나사
|
기음
|
|
|
10-32 나사산 x 0.63인치 길이
|
354C02 및 354C03용 캡 나사
|
기음
|
|
Mounting Studs & Screws
To acquire the best sensor data the sensor must be rigidly affixed to the test article. A rigid connection to the test article results in the highest frequency response possible within the limit of the sensor upper frequency response. Loosely mounting the sensor may result in off-axis orientation. To prevent this, a prerequisite to mounting the sensor is to "face" the mounting location. A flat (faced) surface is required to properly mount the accelerometer. Drill and tap a hole perpendicular to the flat (faced) surface. The mounting stud or screw mates to this hole.
To ensure accurate measurements, always mount the accelerometer to the datasheets recommended mounting torque. Also, avoid bottoming the stud into the test object or accelerometer's tapped mounting hole. A shoulder stud will usually prevent bottoming out. Ensure that the base of the sensor is counter-bored to accept the shoulder. Once installed, the accelerometer's base should be flush with the test articles surface. In temperature environments below the upper temperature limit of a particular grease or light engine oil, a small amount of this grease or oil should "wet" the flat surface interface between the test article and sensor. This grease or oil is often referred to as a "Couplant".
Is it always best practice to use vendor manufactured mounting adaptors instead of end user made mounting devices.
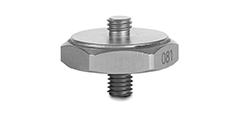
Isolation studs do not allow continuity between the sensor case and the shell of a metallic test article. This prevents "Ground Loops" resulting in better data quality.
Style "A"
Style "B"

Style "C"

Style "D"

Style "E"
|
Mounting Studs & Screws
|
|||
|
Model Number
|
Mounting
|
Comment
|
Style
|
|
5-40 stud to 5-40 stud
|
BeCu, for some triaxial accelerometers
|
B
|
|
|
5-40 stud to 10-32 stud
|
Adaptor stud, BeCu
|
A
|
|
|
5-40 thread to 10-32 stud
|
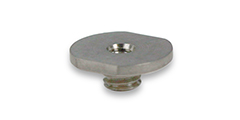
Adaptor plate, 0.5" dia. with 7/16" flats
|
E
|
|
|
5-40 thread to 10-32 stud
|
Adaptor plate, 0.75" dia. with knurl
|
E
|
|
|
M3 x 0.5 thread to 10-32 stud
|
Adaptor plate, 0.5" dia. with 7/16" flats
|
E
|
|
|
M3 x 0.5 thread to 10-32 stud
|
Adaptor plate, 0.75" dia. with knurl
|
E
|
|
|
6-32 thread to 10-32 stud
|
Adaptor plate, 0.75" dia., knurled with 5/8" flats
|
E
|
|
|
10-32 stud to 10-32 stud
|
With shoulder, BeCu, for most accelerometers
|
B
|
|
|
10-32 stud to 10-32 stud
|
Electrical isolation mounting pad/stud, 0.75" hex
|
D
|
|
|
10-32 stud to 10-32 stud
|
Electrical isolation mounting pad/longer stud, 0.75" hex
|
D
|
|
|
10-32 stud to M5 x 0.8 stud
|
Adaptor stud, BeCu
|
A
|
|
|
10-32 stud to M6 x 0.75 stud
|
Adaptor stud, with shoulder, BeCu
|
A
|
|
|
10-32 stud to M6 x 1 stud
|
Adaptor stud, with shoulder, stainless steel
|
A
|
|
|
10-32 stud to 1/4-28 stud
|
Adaptor stud, BeCu
|
A
|
|
|
1/4-28 stud to 1/4-28 stud
|
With shoulder, BeCu
|
B
|
|
|
1/4-28 stud to 1/4-28 stud
|
Stainless steel for Model 350A96 shock accelerometer
|
B
|
|
|
1/4-28 stud to M6 x 0.75 stud
|
Adaptor stud, with shoulder, BeCu
|
A
|
|
|
6-32 thread x 0.63 inch length
|
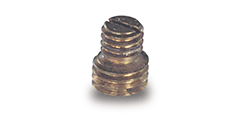
Cap screw for Series 355 ring shaped accelerometers
|
C
|
|
|
M3 x 0.5 thread x 16 mm length
|
Cap screw for Series 355 ring shaped accelerometers
|
C
|
|
|
2-56 thread x 0.375 inch length
|
Cap screw for 355B12 & 357A06
|
C
|
|
|
M2 x 0.4 thread x 0.37 inch length
|
Cap screw for 355B12 & 357A06
|
C
|
|
|
10-32 thread x 0.63 inch length
|
Cap screw for 354C02 & 354C03
|
||
PCB Piezotronics / IMI Sensors 국내총판대리점 - 케이티엠엔지니어링
PCB Piezotronics / IMI Sensors Domestic Distributor - KTM Engineering
PCB Piezotronics / IMI Sensors Exclusive distributor in Korea - KTM Engineering
산업용 센서 / 진동센서 / 진동엔지니어링 / PCB진동센서 / PCB가속도센서 / PCB사진동센서 / PCB사가속도센서 / IMI진동센서 / IMI가속도센서 /
TMS진동캘리브레이터 / TMS Proximity Transducer Calibrator / TMS Portable Vibration Calibrator
-> 케이티엠엔지니어링이 정식 한국대리점입니다.
PCB Piezotronics의 사업부인 IMI Sensors, THE MODAL SHOP 은 가속도계, 진동 트랜스미터 및 진동캘리브레이터 같은 산업용 진동 모니터링 기기의 글로벌 설계 및 제조업체입니다.
국내독점 정식대리점에서 고객 맞춤 서비스를 제공하여 드립니다.
진동, 변위, 하중, 응력 (유, 무선) 측정 전문업체
(주)케이티엠엔지니어링
전화: 031-628-6078
메일: dyk@ktme.com |홈페이지: http://www.ktmeng.com
주소: 경기도 성남시 분당구 대왕판교로 670 유스페이스2 B동 808호
'PCB, IMI社 국내총판독점대리점' 카테고리의 다른 글
| 가속도계 장착 및 제거 도구 Tools for Accelerometer Mounting and Removal (0) | 2025.04.29 |
|---|---|
| PCB Piezotronics / IMI Sensors 국내총판대리점 - 케이티엠엔지니어링 Easy-Mount Clips (0) | 2025.04.29 |
| 3축 진동센서 장착 어댑터 Triaxial Mounting Adaptors 케이티엠엔지니어링 (0) | 2025.04.29 |
| 케이티엠엔지니어링 가속도계 장착 베이스 (0) | 2025.04.29 |
| PCB Piezotronics Petro wax - 케이티엠엔지니어링 - 한국 독점 대리점 (0) | 2025.04.29 |